
Introduction
Welcome to the delightful world of cake pops! Whether you’re planning a festive party or just craving a sweet treat, mastering the art of making cake pops is a fun and rewarding experience. In this comprehensive guide, we’ll walk you through the essentials of crafting these adorable and tasty treats, from selecting the right ingredients to adding those final decorative touches. Ready to get started? Let’s dive into the basics and set you up for cake pop success!
Introduction to Cake Pops
Overview of Cake Pops
Cake pops are a trendy dessert that combines the deliciousness of cake with the convenience of a lollipop. Originating from the creative minds of bakers looking to use leftover cake, these treats have evolved into a popular choice for celebrations and everyday sweet cravings.
Why Make Your Own Cake Pops?
Creating your own cake pops is not just about the end product; it’s about the joy of making something beautiful and delicious with your own two hands. It’s a perfect activity for families, a creative outlet, and a fantastic way to impress guests with something that looks as good as it tastes!
Stay tuned for Part 2 where we delve into the essential ingredients and tools needed to make your cake pops stand out!
Essential Ingredients and Tools
Ingredients List
To start your cake pop journey, you’ll need a few key ingredients. Firstly, the base of your cake pop can be a simple boxed cake mix or a homemade cake of your choice. Vanilla and chocolate are popular options, but feel free to experiment with other flavors like red velvet or lemon for a zesty twist.
Next, to tie the cake crumbs together, you will need icing. A creamy frosting works best—think chocolate or a classic buttercream. The amount of frosting is crucial; too much can make your pops soggy, and too little might not hold them together.
For the coating, candy melts are a favorite due to their smooth finish and variety of colors. However, premium white or dark chocolate are also excellent choices for a richer taste.
Required Tools
The right tools can make the process of making cake pops much easier and more enjoyable. Here are some essentials:
- Cake Pop Sticks: These are necessary for giving your cake pops their classic lollipop appearance.
- Scoop or Spoon: A small ice cream scoop or spoon helps ensure each cake pop is uniformly sized.
- Styrofoam Block: Very handy for letting your cake pops dry and set without messing up their coating.
- Melting Pot or Microwave-Safe Bowl: For melting chocolate or candy melts evenly.
With your ingredients and tools ready, you’re set to move on to the exciting part—making the cake pops! Be sure to catch all the details in Part 3, where we’ll guide you through the step-by-step process of creating these delightful treats.

Step-by-Step Cake Pop Recipe
Preparation of Cake Base
First, you’ll need to prepare your cake base. Whether you’re using a boxed mix or baking from scratch, ensure the cake is baked according to the directions and completely cooled before starting. Once cool, crumble the cake into fine crumbs using either your hands or a food processor. This texture is crucial for the perfect cake pop consistency.
Mixing and Molding
Now, mix in the frosting. Start with a small amount and gradually add more until the mixture is moist enough to hold a ball shape but still slightly crumbly. You’re aiming for a texture that’s easy to shape but not too sticky or wet.
Using a mini scoop, portion out the cake mixture and roll it into tight balls. Put them on a parchment paper-lined baking pan. This is where precision pays off in creating uniform, bite-sized treats that look professional.
Dipping and Decorating Techniques
Once your balls are rolled and chilled (a quick stint in the freezer can help them firm up), prepare your coating. Melt your chocolate or candy melts in a deep, narrow cup—it’s the perfect depth for dipping.
Dip the tip of your cake pop stick into the melted coating before inserting it halfway into a cake ball. This helps the ball stay secure on the stick. Then, dip the cake ball into the coating, ensuring it’s completely covered. Tap off any excess to avoid drippy pops.
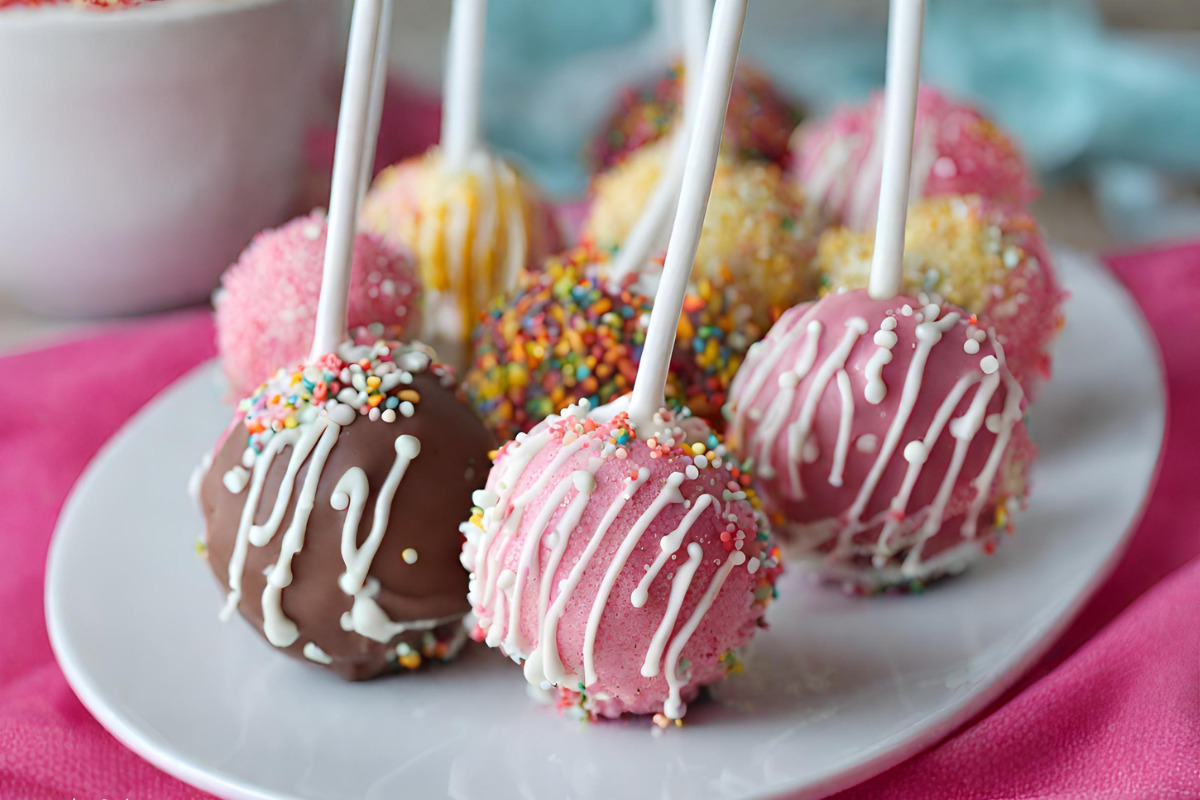
Add sprinkles or other decorations while the coating is still wet. This is your chance to be creative with colors and styles, making each pop a unique creation.
Setting and Serving
Finally, stick the freshly dipped cake pops into a styrofoam block to dry. If you’re in a hurry, popping them into the freezer can speed up the setting time. Once dry, they’re ready to serve and enjoy!
Cake pops are best enjoyed fresh but can be stored in an airtight container in the fridge for a few days, making them perfect for advance preparation.
Join us in Part 4, where we’ll explore some advanced tips and tricks to elevate your cake pop making to the next level!
Advanced Tips and Tricks
Troubleshooting Common Issues
Even the most experienced bakers run into a hiccup now and then. If your cake pops are falling off the sticks, it might be because the cake mixture is too moist; consider adding a little less frosting next time. If the coating cracks after drying, it’s often because the cake balls were too cold when dipped, causing the coating to set too quickly. Let them warm up a bit before dipping.
Creative Variations and Flavors
Once you’ve mastered the basics, the real fun begins with experimentation. Why not try cake pops with a twist? Incorporate flavors like peppermint or mocha for a festive touch, or go for a lemon and thyme duo for something unexpectedly delightful. Mixing cake flavors and coatings can turn an ordinary cake pop into a gourmet treat.
Adapting your cake pops for various dietary needs can also broaden their appeal. Use gluten-free cake mixes and vegan frostings to cater to everyone in your circle.
Keep these tips in mind as you continue your cake pop adventures. Next up, we’ll answer some of the most commonly asked questions in Part 5, so stay tuned for handy insights that will help perfect your pops!
FAQs (Based on ‘People Also Ask’)
How long can you store cake pops?
Cake pops keep well for up to a week at room temperature when kept in an airtight container. For longer storage, you can keep them in the refrigerator for up to two weeks. If you need to store them for an extended period, freezing is a good option; they can last up to a month in the freezer. Just be careful when wrapping them to prevent freezer burn.
Can cake pops be made in advance?
Absolutely! Cake pops are a great make-ahead treat for parties and events. You can prepare them several days in advance and keep them refrigerated until the day of the event. Just allow them to come to room temperature before serving for the best flavor and texture.
Tips for making cake pops with kids
Making cake pops can be a fun activity to do with children. Here are a few tips to make the process enjoyable:
- Prep in Advance: Have all ingredients and decorations ready to go to keep kids engaged without waiting.
- Safety First: Ensure that all hot items, like melted chocolate, are handled by adults to prevent burns.
- Assign Tasks: Give kids specific tasks such as rolling the balls, dipping the sticks, or adding sprinkles. This helps them feel involved and keeps the process orderly.
With these FAQs covered, you’re well-equipped to handle any cake pop query that might come your way. Next, in Part 6, we’ll wrap up with some final thoughts and inspiration for your cake pop making journey!

Conclusion and Inspiration
Recap of Key Points
We’ve covered everything from the basics of preparing your cake pop base to decorating and troubleshooting. Remember, the key to perfect cake pops is balance in your ingredients and patience during the making process. Whether you’re making them for a special occasion or just as a treat, the versatility and delight of cake pops are sure to impress.
Encouragement to Experiment
Now that you’re familiar with the standard methods, why not branch out? Experiment with different cake flavors, coatings, and decorations. Seasonal themes, like spooky Halloween ghosts or sparkling Christmas ornaments, can add a festive touch to your creations. The possibilities are truly endless when it comes to designing your cake pops.
Call to Action: Share Your Creations
We are excited to see the suggestions you have! Share your cake pop recipe creations on social media and tag us. It’s a joy to see how each baker brings their unique twist to this delightful treat. Who knows? Your innovative design might just be the next big trend in the cake pop recipe world!
We appreciate your participation in this wonderful journey. Keep mixing, dipping, and decorating, and most importantly, have fun as you master the art of making cake pops!
Can cake pops be customized for dietary restrictions?
Yes, cake pops are wonderfully versatile and can easily be adapted to meet various dietary needs. For gluten-free cake pop recipe , use a gluten-free cake mix and ensure that all other ingredients, like frosting and decorations, are gluten-free. For vegan options, substitute the cake and frosting with vegan-friendly products and use plant-based chocolates or candy melts for the coating.
What are some creative decorating ideas for cake pops?
The sky’s the limit when it comes to decorating cake pops. Here are some suggestions to stimulate your imagination:
- Themed Decorations: Match your cake pops to the theme of your party or event. Use colors and decorations to make them festive for holidays, sports teams, or special occasions.
- Sprinkle Medley: Mix different shapes and colors of sprinkles for a fun, textured look.
- Drizzle with Style: Use a contrasting color of chocolate to drizzle over your dipped cake pop recipe for a professional touch.
- Character Pops: Mold your cake pops into characters or shapes to fit a particular theme, like animals for a children’s party.
How do I ensure my cake pops are smooth and evenly coated?
Achieving a smooth, even coat on your cake pops involves a few key steps:
- Smooth Balls: Ensure your cake balls are smooth and free of crumbs before dipping.
- Proper Melting: Melt your coating thoroughly so it’s smooth and fluid. Think about thinning the coating with some paramount crystals or coconut oil if it is too thick.
- Dipping Technique: Dip the cake pop recipe straight down into the coating and pull it out without twisting. Tap off any excess gently.
By addressing these additional FAQs, you’re now equipped to tackle a variety of cake pop recipe challenges and questions. Whether you’re a beginner or a seasoned pro, these tips and tricks will help elevate your cake pop recipe game to new heights. Enjoy the creative process, and don’t forget to share your delicious masterpieces!